使用Maven构建Java项目
如今很多Java项目应该都采用Maven进行构建, 其依赖管理, 配置式工作原理使得项目构建也变得比较灵活统一。
基础, Maven基于XML进行配置, 其配置文件叫pom.xml, 如
<project xmlns="http://maven.apache.org/POM/4.0.0" xmlns:xsi="http://www.w3.org/2001/XMLSchema-instance" xsi:schemaLocation="http://maven.apache.org/POM/4.0.0 http://maven.apache.org/xsd/maven-4.0.0.xsd"> <modelVersion>4.0.0</modelVersion> <artifactId>module-name</artifactId> <packaging>jar</packaging> <version>pacakge version</version> <name>module-name</name> <url>http://maven.apache.org</url> <!-- jar包依赖管理--> <dependencies> <dependency> ... </dependency> </dependencies> <!-- 插件配置 --> <build> <plugins> ... </plugins> </build></project> 多模块开发
通常我们的项目都会有多个模块, 合理地拆分模块, 也会使得我们的项目更清晰, 更容易维护, 甚至使得模块间的依赖关系更简单, 如
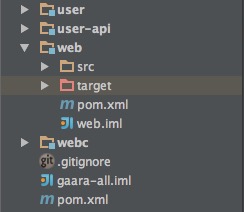
这里有4个模块, 我们会将api(如user-api)及其实现(如user)分开, 这样做对以后要替换或扩展实现,或者暴露给外部, 甚至作服务化时都是有好处的,web模块依赖了user和webc模块, 那么我们会有一个root pom.xml作为整个项目的配置中心
<project xmlns="http://maven.apache.org/POM/4.0.0" xmlns:xsi="http://www.w3.org/2001/XMLSchema-instance" xsi:schemaLocation="http://maven.apache.org/POM/4.0.0 http://maven.apache.org/xsd/maven-4.0.0.xsd"> <modelVersion>4.0.0</modelVersion> <groupId>com.xxx.yyy</groupId> <artifactId>project-all</artifactId> <version>project-version</version> <!-- 子模块 --> <modules> <module>user-api</module> <module>user</module> <module>web</module> <module>webc</module> </modules> <packaging>pom</packaging> <!-- root模块packaging为pom类型 --> <name>project-all</name> <url>http://maven.apache.org</url> <!-- 项目属性, 如依赖版本, 一些插件属性配置 --> <properties> ... </properties> <!-- 项目依赖包管理, 子项目只需依赖对应dependency的groupId, artifactId --> <dependencyManagement> <dependencies> ... </dependencies> </dependencyManagement> <!-- 项目插件管理 --> <build> <pluginManagement> ... </pluginManagement> </build> <!-- 远程仓库 --> <repositories> <repository> ... </repository> </repositories> <!-- 其他, 如发布仓库等 --></project> 而对应的某个子模块pom.xml配置:
<?xml version="1.0" encoding="UTF-8"?><project xmlns="http://maven.apache.org/POM/4.0.0" xmlns:xsi="http://www.w3.org/2001/XMLSchema-instance" xsi:schemaLocation="http://maven.apache.org/POM/4.0.0 http://maven.apache.org/xsd/maven-4.0.0.xsd"> <parent> <artifactId>project-all</artifactId> <groupId>com.xxx.yyy</groupId> <version>project-version</version> </parent> <modelVersion>4.0.0</modelVersion> <artifactId>module1</artifactId> <packaging>war</packaging> <!-- module为web项目 --> <name>module1</name> <url>http://maven.apache.org</url> <!-- 来自parent模块里的dependencyManagement中的依赖包配置 --> <dependencies> ... </dependencies> <build> <!-- 来自parent模块里的pluginManagement中的插件配置 --> <plugins> <plugin> ... </plugin> </plugins> <!-- 环境配置, 这将实现切换环境的特性 --> <profiles> ... </profiles> <!-- 其他配置 --> ... </build></project> 不同环境切换
项目开发中, 我们可能会有很多不同的环境配置, 如DB源, 服务器host等, 我们不可能每次发布都去手动更改配置, 这既繁琐又容易出错, 那基于Maven我们怎么优雅地来切换不同环境呢?如上面所说, Maven可通过profile机制和filtering机制实现环境切换, 如:
<build> <finalName>web</finalName> <!-- war包名 --> <resources> <resource> <!-- 资源目录 --> <directory>src/main/resources</directory> <!-- 开启filtering机制 --> <filtering>true</filtering> </resource> </resources></build><profiles> <!-- 默认开发环境 --> <profile> <id>dev</id> <activation> <activeByDefault>true</activeByDefault> </activation> <build> <filters> <!-- 使用dev.properties --> <filter>src/main/filter/dev.properties</filter> </filters> </build> </profile> <!-- 测试环境 --> <profile> <id>test</id> <build> <filters> <!-- 使用test.properties --> <filter>src/main/filter/test.properties</filter> </filters> </build> </profile></profiles> 项目结构如下
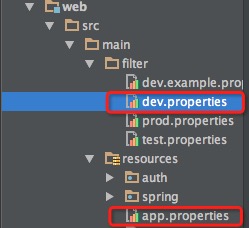
对应的配置文件
# dev.propertiesenv=devprops.one=123props.two=456 # test.properties:env=testprops.one=123abcprops.two=456abc # app.properties:env=${env}props.one=${props.one}props.two=${props.two} 这样我们就可以不同环境使用不同的profile进行编译打包了:
mvn clean package -Pdevmvn clean package -Ptest 通过这种方式我们就可以灵活的切换不同的环境, 甚至可以在不同的环境切换不同的实现等。
若properties文件中有中文值出现,则会出现乱码,猜测maven-resource-plugin读取properties文件时采用的是二进制流的方式,查阅后发现该插件的PropertiesUtil.loadPropertyFile()方法中确实使用FileInputStream读取properties。要解决中文乱码,可以将中文值进行Unicode转码,或者使用Reader(如InputStreamReader)读取properties文件,则需修改插件源码。
使Spring感知到当前环境
既然我们已经能通过maven编译打包不同的环境配置了, 那要怎么告知Spring当前是什么环境呢?在Spring ApplicationContext对象中有一个环境配置属性environment
/** Environment used by this context; initialized by [email protected] #createEnvironment()} */private ConfigurableEnvironment environment;// 该环境配置对象通过属性spring.profiles.active来进行环境配置/*** Name of property to set to specify active profiles: [email protected]}. Value may be comma* delimited.* Note that certain shell environments such as Bash disallow the use of the period* character in variable names. Assuming that Spring's [email protected] SystemEnvironmentPropertySource}* is in use, this property may be specified as an environment variable as* [email protected] SPRING_PROFILES_ACTIVE}.* @see ConfigurableEnvironment#setActiveProfiles*/public static final String ACTIVE_PROFILES_PROPERTY_NAME = "spring.profiles.active";<!--若对于Web应用, 我们当然可以在初始化Spring根容器时指定该属性值, 即在web.xml中指定:--><context-param> <param-name>spring.profiles.active</param-name> <param-value>${env}</param-value> <!-- 该值会在maven打包时替换掉 --></context-param><!-- Spring Root Context --><listener> <listener-class>org.springframework.web.context.ContextLoaderListener</listener-class></listener> // 当然, 你也可以通过Java系统属性来设置System.setProperty("spring.profiles.active", "dev"); <!--于是你就可以在Spring的配置文件里, 在不同的环境中匹配不同的配置了--><beans profile="dev, test"> ...</beans><beans profile="prod"> ...</beans> 如今, 除了Maven外, 有了更加灵活强大的构建工具Gradle, Spring已经采用了其进行构建, 其通过Groovy动态语言及编程式构建项目, 不妨也可以实践实践。
